Using VBScript to run Excel macro

I have a folder containing several Excel files, each containing a macro named “FETCH_LATEST_DATA”. The following steps will detail how I had scheduled a VBScript to run these Excel macros nightly.

First, I created the VBScript below that opens each Excel file successively and calls the particular macro. Note that I have disabled alerts and events since I intended to run it as an unattended job, and that I am using “Wscript.Echo” to output some start/end info for debugging purposes should something go wrong in the future.

excelFolder = "\\fileserver\share\folder"

Set objFso = CreateObject("Scripting.FileSystemObject")
Set objFolder = objFso.GetFolder(excelFolder)

Set excelApp = CreateObject("Excel.Application")
excelApp.DisplayAlerts = False
excelApp.EnableEvents = False

for each objFile In objFso.GetFolder(excelFolder).files
	Wscript.Echo "Starting " & objFile.name & " " & now
	
	filename = objFile.name
	
	Set excelBook = excelApp.Workbooks.Open(excelFolder & "\" & filename)

	If excelBook.ReadOnly Then
		Wscript.Echo "Readonly mode detected, skipping"
	Else
		excelApp.Run "FETCH_LATEST_DATA"
		excelBook.Save
	End if

	Wscript.Echo "Ending " & objFile.name & " " & now
	
	excelBook.Close False
	set excelBook = Nothing
Next

excelApp.Quit
Set excelApp = Nothing
set objFso = nothing
WScript.Quit

Next, I inserted a line in my already-existing batch file that contains all the other jobs that I typically run on this Windows server every evening. Note that I am using “>>” to direct any console output (see “Wscript.Echo” above) to a log file should there be any debugging needs.

[...]
C:\windows\syswow64\cscript.exe C:\scripts\update_excel.vbs >> update_excel.log
[...]

Before we can run Excel unattended, we must create these two folders. If these two folders are missing, the scheduled job would sit perpetually in Windows Task Scheduler as if running, but it would never actually complete; in the way that the logging info is setup above, you would see something like “Starting file1.xlsm 6/20/2019 10:15:00 AM” without any additional lines being logged. If your Windows server is running in 32-bit mode, you can ignore the second folder.

C:\Windows\System32\config\systemprofile\Desktop

C:\Windows\SysWOW64\config\systemprofile\Desktop

Facebook App Review for Server-to-Server Apps

In a database table, I kept interesting World War II facts that took place on every date throughout the course of a calendar year. I had scheduled a Python script to make daily queries against this table with the current date, and then posts the result on my WW2DB Facebook Page via Facebook GraphAPI. This was deployed some years ago and had been working without a hitch.

In 2018, in response to the many security/privacy related problems that you undoubtedly had read about, Facebook tightened things up quite a bit. Understandably, my process was affected. Facebook informed me that I had to undergo an app review, particularly to justify my need for these two API calls:

  • manage_pages
  • publish_pages

I initially received this request for app review around July or August 2018. I immediately got to work. Surprisingly, I was repeatedly rejected, most of the time the reason was that I failed to show Facebook folks how a user logins in to Facebook using my app, despite I clearly noted that my application was a server-to-server app that had no user interface. I reached out to a good friend who works at Facebook just to see if he happens to know anyone who might know someone with this knowledge; he came back telling me that everyone he spoke to was equally stumped. Life got busy, and I forgot about this issue for a while. I did not pick it up until last week. After two more rejections, today, 5 February 2019, I finally got everything straightened out after more than half a year (but again, my own delay in late 2018 admittedly also dragged it on a bit).

You would imagine this to be a straight-forward process, right? I guess not! Hopefully, my notes below will help you shorten the time you need to get your server-to-server app approved.

First, the basics. Go to https://developers.facebook.com/apps/, find and click on your application. Then, click “Settings” on the left, and then “Basic”; in here, I have these fields populated: Display Name, Contact Email, Private Policy URL, Terms of Service URL, App Icon, and Category. On the bottom of the page, I added “Website” as my platform (note there is no option for a server-to-server application).

Then, go to “App Review” and then “Permissions and Features”. Scroll down to “manage_pages” and click on the “Request” button. Do the same for “publish_pages”. Then click the “Continue” link to fill out some info for each of the two.

For “publish_pages”:

  • “Tell us how you’re using this permission or feature” — I told them that this is a server-to-server application, explained how my Python script queries my database, and then uses Facebook GraphAPI to post to my own page.
  • “Demonstrate how your selected platforms will use this permission or feature” — I checked “web” (note there is no option for server-to-server), and then in the text box listed the 3 steps below, and then noted that I would be uploading a blank screencast (it was literally a 5-minute-long video of a black screen) because this server-to-server app has no user interface. I also offered to send them the source code of my script if Facebook wanted to look at it (in fact, in one of my failed attempts to secure permission, my screencast was actually showing my source code so they could have a developer confirm the code does what I described).
    1. My Python script queries my database for relevant entries for the current date
    2. The script then creates an instance of Facebook GraphAPI
    3. Use the “.put_object” method to make a post on my own page https://www.facebook.com/worldwar2
  • Then, I uploaded the blank video aforementioned.

For “manage_pages”:

  • “Tell us how you’re using this permission or feature” — Copy/pasted the same as above.
  • “Demonstrate how your selected platforms will use this permission or feature” — I checked “Server-to-Server” option, and then copy/pasted the same text as above; less the mention of the blank video.

After saving those two, I submitted my request.

In my case, a business day or so later, I received word of my approval, but final implementation was pending me proving my business is legitimate. If you have this requirement as well, in addition to showing your business as legitimate, you will also want to show that your business phone number is legitimate. To satisfy these two requirements, I uploaded scans of:

  1. The Business Registration Certificate showing that my business had been properly registered with the government. In my case, it is the state of New Jersey in the United States; your document may be titled differently. This document shows my business name and mailing address, but it does not show my phone number.
  2. The contract I signed on behalf of my business renting a mailbox from the local UPS Store. This document shows my business name, mailing address, and phone number.
  3. United States Postal Service Application for Delivery of Mail Through Agent, which was signed by both the manager of the UPS Store and myself on behalf of my business. This document shows my business name, mailing address, and phone number. The UPS Store contract alone probably was enough, but I thought I would upload this, just in case.

While I understand there are a lot of shady elements on the web, and Facebook had been a victim of those elements, this whole process was not easy. Official instructions I found on Facebook site was slightly out-dated, and there was no way for me to get any human assistance. The end result was that Facebook’s reviewers had to spend extra time re-reviewing my repeated attempts, and I needed to spend extra time rewording my requests while trying to guess what Facebook wanted to see. In comparison, when Google (via its Adsense program) recently requested me to comply to GPDR, I was able to easily reach a human (via email), who clarified exactly what actions I needed to take. After I implemented the requirements, he even emailed me back to confirm my compliance. The experience with Google was much smoother when compared to Facebook’s.

Large listener.log file size causing Oracle Listener to fail

Recently, I ran into a case in which the user was attempting to log on to a database, but the log on process was simply churning and churning without coming to an end. When I tried to perform a TNSPING against it, that process also failed to return any results, or at least not in a reasonable amount of time.

Thinking that it might be caused by a dead listener, I went on to the server and attempted to use the LSNRCTL command to restart the listener. Surprisingly, I was encountered with a number of errors, including “TNS-12541: TNS:no listener” and “TNS-12560: TNS:protocol adapter error”.

I was able to find a much more knowledgeable DBA to locate root problem — On this Windows-hosted Oracle database server, the listener.log file had grown too large. Our solution:

1. Archive the old listener.log file
2. Create an empty file by the same name

After those two action, the listener was able to restart successfully, allowing user connections once again.

Implementing OpenStreetMap

Google recently announced a change in their Maps API usage quota that will inevitably move some current users from the previously free tier into a paid tier. I thought this might perhaps drive more developers to switch from Google Maps to OpenStreetMap if only for budget reasons, so hopefully the following guide would help get things started.

OpenStreetMap implementation is actually just as simple as Google Maps, especially when coupled with Javascript libraries focused on building maps. In the following example, I used Leaflet. As far as tiles are concerned, I used tiles by Stamen. While I personally like Stamen’s tiles a lot, there are many tiles available across the web with different styles, and some might fit your particular niche or style better; check out this link for a few others. Finally, for the data, I used some data from Lava’s WW2DB project.

To get things started, I created a div that will eventually contain the map. Then, I linked to the .css stylesheet and the .js package files:

<div id="mapdiv" style="width: 400px; height: 400px;"></div>
<link rel="stylesheet" href="https://unpkg.com/leaflet@1.3.1/dist/leaflet.css" integrity="sha512-Rksm5RenBEKSKFjgI3a41vrjkw4EVPlJ3+OiI65vTjIdo9brlAacEuKOiQ5OFh7cOI1bkDwLqdLw3Zg0cRJAAQ==" crossorigin=""/>
<script src="https://unpkg.com/leaflet@1.3.1/dist/leaflet.js" integrity="sha512-/Nsx9X4HebavoBvEBuyp3I7od5tA0UzAxs+j83KgC8PU0kgB4XiK4Lfe4y4cgBtaRJQEIFCW+oC506aPT2L1zw==" crossorigin=""></script>

Then, a snippet of PHP code fetched necessary data from the WW2DB backend database, and used the data to build a Javascript array. The resulting Javascript array that I built looked something like this:

var rawDataArray = [
	{ "name": "This is marker #1", "lat": "10", "lng": "10" },
	{ "name": "This is marker #2", "lat": "20", "lng": "20" },
	{ "name": "This is marker #3", "lat": "30", "lng": "30" },
	...
];

Now comes the main part. You will see that it is not too complex, even if have little experience with Google Maps, OpenStreetMap, or Leaflet.

// Initialize the map (parameters: initial latitude, initial longitude, zoom level)
var mymap = L.map('mapdiv').setView([0, 0], 13);

// Specify tiles
L.tileLayer('https://stamen-tiles-{s}.a.ssl.fastly.net/terrain/{z}/{x}/{y}.{ext}', {
	attribution: 'Tiles <a href="http://stamen.com">Stamen Design</a>, <a href="http://creativecommons.org/licenses/by/3.0">CC BY 3.0</a> — Data <a href="http://www.openstreetmap.org/copyright">OpenStreetMap</a>',
	subdomains: 'abcd',
	minZoom: 0,
	maxZoom: 18,
	ext: 'png'
}).addTo(mymap);

// Loops through the raw data, place a point on the map, and build an array of the points
var circleArray = [];
for (var i = 0; i < rawDataArray.length; i++) {
	var rawData = rawDataArray[i];
	circle = new L.circle([rawData["lat"], rawData["lng"]], {
		color: 'red',
		fillColor: '#f03',
		fillOpacity: 0.5,
		radius: 50
	}).addTo(mymap).bindPopup(L.popup({maxHeight:200}).setContent(rawData["name"]));
	circleArray.push(circle);
}

// Adjust the map view based on the array of points, so the map won't appear to be zoomed overly in or out
var group = new L.featureGroup(circleArray);
mymap.fitBounds(group.getBounds());

Here's an example I implemented for showing WW2-era facilities found on the island of Taiwan:


While this worked for 99% of maps found on WW2DB, I discovered a small problem with Leaflet in which the .fitBounds() method did not handle things well when a single data set contains points on both sides of the International Date Line. To be fair, this is not truly a Leaflet problem; this issue is generally a headache across all mapping programs, although this is something I did not notice with Google Maps before. Here is an example demonstrating said problem involving points located in the Territory of Alaska:

I developed a work-around for this. Recall I used a PHP snippet to fetch data from the backend and to build the Javascript array for Leaflet to use. I modified the PHP code so that as I looped through the data, I would also keep counts of points with really low (I used 120 or less) or really high (I used 120 or more) longitude values. With this two counts, I could then have the PHP determine whether I would bring some points to the other side of the International Date Line by adding or subtracting 360 degrees to their longitude values. At this time, I made that determination by evaluating the number of points that would remain/would be moved. For the case of Alaska, with this logic applied, the PHP code would decide that all data points with longitude value less than 120 will have 360 added to it; for example, (54.359349,-159.66807) will become (54.359349,200.33193). After applying this work-around, the Alaska map becomes this:

Installing xRDP on Ubuntu

I installed xRDP on my Ubuntu 16.04 LTS so that I can easily connect to my Linux box from any Windows machine using the remote desktop tool that comes by default with every Windows installation. The actually installation is very simple:

sudo apt-get install xrdp

Through another post, you will see that I have the Xfce4 desktop environment installed:

https://www.dev-notes.com/blog/2018/03/30/installing-xfce4-desktop-environment/

Xfce4 plays very well with xRDP. To launch Xfce4 when a xRDP session is conneted, add this line to your .xsession file:

echo xfce4-session >~/.xsession

And then edit your startwm.sh file using your favorite text editor (nano is used below as example); add “startxfce4” without the quotes to the end of that file.

sudo nano /etc/xrdp/startwm.sh

At this point, you can either restart the machine, or run the two commands below to ensure xrdp is ready to accept connections.

sudo service xrdp restart
sudo /usr/sbin/xrdp-sesman

Finally, I noticed that when I am connected from a Windows machine, my tab key did not work correctly, causing me to lose the ability to autocomplete file names, among other things. It ended up the fix is very easy. Again, launch your favorite text editor to open up this Xfce configuration file:

nano ~/.config/xfce4/xconf/xfce4-keyboard-shortcuts.xml

Look for this line:

<property name="<Super>Tab" type="string" value="switch_window_key" />

And modify it to this line below:

<property name="<Super>Tab" type="empty" />

Installing Xfce4 Desktop Environment

Xfce is a light weight desktop environment for Linux that is suitable for those who prefer to not waste system resources on eye candy, for those who prefer to keep things simple, or for those who want to add a few more years of useful life to older machines. Below are the steps I followed to install Xfce4 on my machine running Ubuntu 16.04 LTS.

https://xfce.org

1. Minimally, I needed to install the main Xfce4 package.

sudo apt-get install xfce4

One of the first things I did was to adjust how the clock displayed. This guide helped me get started:

%% a literal %
%a locale's abbreviated weekday name (e.g., Sun)
%A locale's full weekday name (e.g., Sunday)
%b locale's abbreviated month name (e.g., Jan)
%B locale's full month name (e.g., January)
%c locale's date and time (e.g., Thu Mar  3 23:05:25 2005)
%C century; like %Y, except omit last two digits (e.g., 21)
%d day of month (e.g, 01)
%D date; same as %m/%d/%y
%e day of month, space padded; same as %_d
%F full date; same as %Y-%m-%d
%g last two digits of year of ISO week number (see %G)
%G year of ISO week number (see %V); normally useful only with %V
%h same as %b
%H hour (00..23)
%I hour (01..12)
%j day of year (001..366)
%k hour ( 0..23)
%l hour ( 1..12)
%m month (01..12)
%M minute (00..59)
%n a newline
%p locale's equivalent of either AM or PM; blank if not known
%P like %p, but lower case
%r locale's 12-hour clock time (e.g., 11:11:04 PM)
%R 24-hour hour and minute; same as %H:%M
%s seconds since 1970-01-01 00:00:00 UTC
%S second (00..60)
%t a tab
%T time; same as %H:%M:%S
%u day of week (1..7); 1 is Monday
%U week number of year, with Sunday as first day of week (00..53)
%V ISO week number, with Monday as first day of week (01..53)
%w day of week (0..6); 0 is Sunday
%W week number of year, with Monday as first day of week (00..53)
%x locale's date representation (e.g., 12/31/99)
%X locale's time representation (e.g., 23:13:48)
%y last two digits of year (00..99)
%Y year
%z +hhmm numeric timezone (e.g., -0400)
%Z alphabetic time zone abbreviation (e.g., EDT)

If you are curious, my setup is:

%a, %d %b %Y, %r

Which translates to, for example, “Fri, 30 Mar 2018, 10:25:25 PM”

Xfce follows the “do one thing, and do it well” philosophy, so it is literally just a desktop environment and nothing else. Read on to see the few additional packages I installed as add-ons for my Xfce installation.

2. Out of box, Xfce did not come with an application menu. I opted for Whisker menu.

sudo add-apt-repository ppa:gottcode/gcppa
sudo apt-get install xfce4-whiskermenu-plugin

You can customize various things with Whisker menu for the right look and usability that suits you.

3. I had installed this on a laptop, so it would be nice to display a battery meter. This can be done through xfce4-power-manager. As a bonus, this package also gave the ability to adjust screen brightness via a GUI tool.

sudo apt-get install xfce4-power-manager

4. There are tons of screenshot tools available for Linux, and there are actually several that are better than the Xfce one. I installed the Xfce screenshot tool nevertheless, to try it out as part of the greater Xfce offering.

sudo apt-get install xfce4-screenshooter-plugin

I set up a keyboard shortcut to the Print Screen key. The short cut runs:

xfce4-screenshooter -w -s ~/pics/screenshots/

I had wanted to try out Xfce purely out of curiocity, but I did get a nice bonus out of it — Xfce4 plays well xith xRDP, that means I could easily open a remote desktop session to my Linux machine from any Windows machine, since remote desktop comes installed by default on Windows. For details on how I installed and configured xRDP, please see:

https://www.dev-notes.com/blog/2018/03/30/installing-xrdp-on-ubuntu/

Customizing a DZ60 Keyboard using QMK

This is my 60% keyboard built on the DZ60 Rev 2.0 printed circuit board.
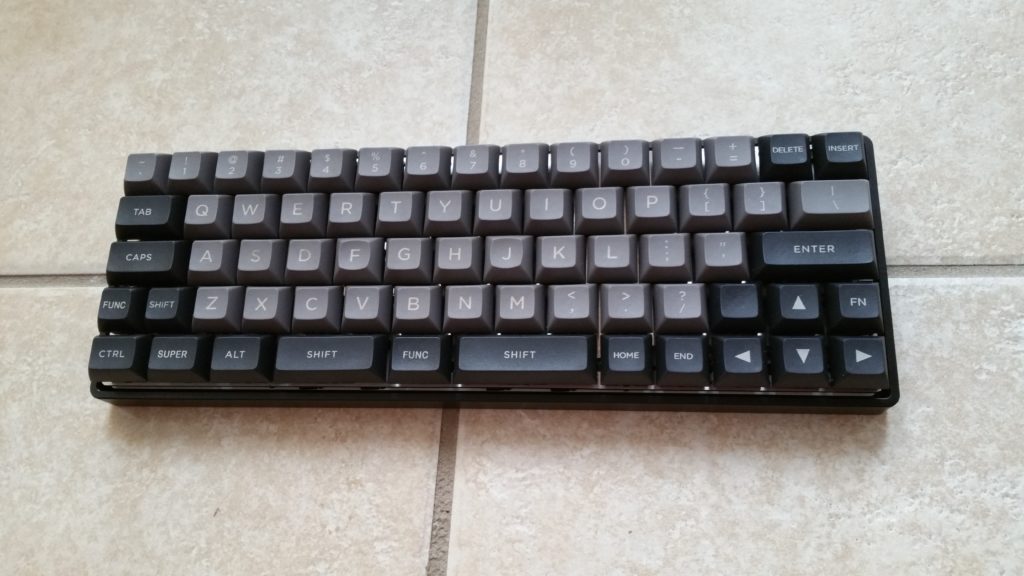
These are the steps I took to configure it for my use. Please note that I had configured this keyboard using Linux; Windows and Mac alternatives exist, but they are outside the scope of this article.

1. The DZ60 can be customized using Quantum Mechanical Keyboard Firmware. I downloaded a copy of it here: https://github.com/qmk/qmk_firmware/zipball/master.

2. I then unzipped the files to ~/software/qmk/

3. Run this shell script to ensure all dependencies are installed:

sudo ~/software/qmk/util/install_dependencies.sh

4. Create a folder that will hold my custom keymapping file: ~/software/qmk/keyboards/dz60/keymaps/cpc1/keymap.c

I am utilizing 4 layers. Generally speaking:

Layer 0 is the main layer containing QWERTY and other such keys that I will use most often.

Layer 1 is activated by holding the key located beneath B. This layer contains F1-F12, basic navigation (ESDF for cursor movement, page up/down), volume control, and number pad (at right hand home row region).

Layer 2 is activated by holding the key located beneath NM.. This layer contains mouse navigation keys (ESDF for mouse movement, XCV as the three mouse buttons).

Layer 3 is activated by holding the key located beneath ENTER and to the right of UP. This layer contains keyboard hardware control keys (reset, LED controls).

This is my full keymap.c file:

#include "dz60.h"
#define __      KC_TRNS
#define ___     KC_TRNS
#define _______ KC_TRNS
#define HY      KC_HYPR
#define LST     KC_LSFT
#define SP_MO1  LT(1, KC_SPC)
#define BS_MO2  LT(2, KC_BSPC)
#define PN_MO3  LT(3, KC_PSCR)
const uint16_t PROGMEM keymaps[][MATRIX_ROWS][MATRIX_COLS] = {

	// Layer 0 - Standard keyboard
	KEYMAP_2_SHIFTS(
		KC_GESC, KC_1   , KC_2   , KC_3   , KC_4   , KC_5   , KC_6   , KC_7   , KC_8   , KC_9   , KC_0   , KC_MINS, KC_EQL , KC_DEL , KC_INS, 
		KC_TAB , KC_Q   , KC_W   , KC_E   , KC_R   , KC_T   , KC_Y   , KC_U   , KC_I   , KC_O   , KC_P   , KC_LBRC, KC_RBRC, KC_BSLS, 
		KC_ESC , KC_A   , KC_S   , KC_D   , KC_F   , KC_G   , KC_H   , KC_J   , KC_K   , KC_L   , KC_SCLN, KC_QUOT, KC_ENT , 
		HY, LST, KC_Z   , KC_X   , KC_C   , KC_V   , KC_B   , KC_N   , KC_M   , KC_COMM, KC_DOT , KC_SLSH, KC_RSFT, KC_UP  , PN_MO3 ,
		KC_LCTL, KC_LGUI, KC_LALT, KC_SPC , SP_MO1 , BS_MO2 , KC_HOME, KC_END , KC_LEFT, KC_DOWN, KC_RGHT),

	// Layer 1 - Cursor Navigation, Volume, Number Pad
	KEYMAP_2_SHIFTS(
		_______, KC_F1  , KC_F2  , KC_F3  , KC_F4  , KC_F5  , KC_F6  , KC_F7  , KC_F8  , KC_F9  , KC_F10 , KC_F11 , KC_F12 , _______, _______, 
		KC_TAB , KC_HOME, KC_PGUP, KC_UP  , KC_PGDN, _______, _______, KC_7   , KC_8   , KC_9   , KC_PPLS, KC_PMNS, _______, _______, 
		_______, KC_END , KC_LEFT, KC_DOWN, KC_RGHT, _______, _______, KC_4   , KC_5   , KC_6   , KC_PAST, KC_PSLS, KC_PENT, 
		HY, LST, KC_MUTE, KC_VOLD, KC_VOLU, _______, _______, _______, KC_1   , KC_2   , KC_3   , _______, _______, _______, _______, 
		KC_LCTL, KC_LGUI, KC_LALT, _______, _______, KC_0   , KC_PDOT, _______, _______, _______, _______),

	// Layer 2 - Mouse Navigation
	KEYMAP_2_SHIFTS(
		_______, _______, KC_ACL0, KC_ACL1, KC_ACL2, _______, _______, _______, _______, _______, _______, _______, _______, _______, _______, 
		KC_TAB , _______, _______, KC_MS_U, _______, _______, _______, _______, _______, _______, _______, _______, _______, _______, 
		_______, _______, KC_MS_L, KC_MS_D, KC_MS_R, _______, _______, _______, _______, _______, _______, _______, _______, 
		HY, LST, _______, KC_BTN1, KC_BTN3, KC_BTN2, _______, _______, _______, _______, _______, _______, _______, _______, _______, 
		KC_LCTL, KC_LGUI, KC_LALT, _______, _______, _______, _______, _______, _______, _______, _______),


	// Layer 3 - Keyboard Hardware Controls
	KEYMAP_2_SHIFTS(
		RESET  , _______, _______, _______, _______, _______, _______, _______, _______, _______, _______, _______, _______, _______, _______, 
		_______, _______, _______, _______, _______, _______, _______, _______, _______, _______, _______, _______, _______, _______, 
		_______, RGB_TOG, RGB_MOD, RGB_HUI, RGB_HUD, RGB_SAI, RGB_SAD, RGB_VAI, RGB_VAD, _______, _______, _______, _______, 
		__, ___, BL_TOGG, BL_DEC , BL_INC , _______, _______, _______, _______, _______, _______, _______, _______, _______, _______, 
		_______, _______, _______, _______, _______, _______, _______, _______, _______, _______, _______),
};

5. Open a terminal window and navigate to ~/software/qmk/

6a. Run this command if you just want to create a hex file without actually flashing the keyboard:

sudo make dz60:cpc1

6b. Or, hold spacebar and B on the keyboard while plugging it into your computer; this will start the keyboard in bootloader mode. Now I can run the following command to compile the hex and then flash it onto the keyboard:

sudo make dz60:cpc1:dfu

6c. Or, if the keyboard is already plugged in and in use, run this command (same as 5b above). When the hex is built, it will prompt you to reset the keyboard so that the hex can be flashed onto the keyboard. In my case, my reset button is in Layer 3, as noted earlier.

sudo make dz60:cpc1:dfu

Additional info:

Full Documentation: https://docs.qmk.fm
GitHub of QMK Project: https://github.com/qmk/qmk_firmware/
Scheduling Jobs with Oracle 9i DBMS_JOB Package

Creating a new job that runs every day at 4:00am:

declare 
	l_job number; 
begin 
	dbms_job.submit(
		l_job, -- OUT; the job ID number that will be generated
		'schema_name.procedure_name;', -- IN; the name of the job you wish to run, aka. "what"
		trunc(sysdate)+1+4/24,  -- IN; the first time the job will be run
		'trunc(sysdate)+1+4/24' -- IN; the interval the job will be repeated
	); 
end; 

Regarding the interval, here are some examples:

-- Every 15 minutes starting from the minute/second of the previous execution
'sysdate+1/24/4'

-- Every hour, same minute/second as the previous execution
'sysdate+1/24'

-- Every hour, at the 15-minute mark
'trunc(sysdate, 'hh')+1/24+15/24/60'

-- Every hour, limited to between 9:00am and 5:00pm
'case when to_char(sysdate, ''hh24mi'') between ''0900'' and ''1700'' then sysdate+1/24 else null end'

-- Every 3 days, same hour/minute/second as the previous execution
'sysdate+3'

-- Every day at 5:00am
'trunc(sysdate)+1+5/24'

-- Every Monday at 5:00am
'next_day(trunc(sysdate), ''monday'')+5/24'

To see a list of existing jobs:

select * from dba_jobs;

Altering all properties of an existing job:

begin
	dbms_job.change(
		123, -- IN; job ID number
		'schema_name.procedure_name;', -- IN; the name of the job, aka. "what"
		trunc(sysdate)+1+4/24,  -- IN; the first time the job will be run after this change
		'trunc(sysdate)+1+4/24' -- IN; the interval the job will be repeated
	);
end;

Altering just the “what”:

begin
	dbms_job.what(
		123, -- IN; job ID number
		'schema_name.procedure_name;' -- IN; the name of the job, aka. "what"
	);
end;

These procedures allows you to make changes in a manner very similar to dbms_job.what illustrated above:

	.next_date
	.interval

Force a job to run:

begin
	dbms_job.run(123);
	-- ... where the "123" is the job's ID number
end;

Removing an existing job:

begin
	dbms_job.remove(123);
	-- ... where the "123" is the job's ID number
end;

Ubuntu Boot Partition Full

The other day when I attempted to run some regular updates for my Linux box (running Ubuntu 14.04 LTS), I encountered the message that the update could no proceed because the boot partition was full. Here are the steps I took to clear unneeded files from the boot partition.

1. First, I found out that I am running kernel 3.19.0-65 with this command below.

me@computer:~$  uname -r

3.19.0-65-generic

2. Next, list what kernel images are present in my root partition.

me@computer:~$ dpkg --list | grep linux-image

ii  linux-image-3.19.0-61-generic
3.19.0-61.69~14.04.1                                amd64        Linux
kernel image for version 3.19.0 on 64 bit x86 SMP
ii  linux-image-3.19.0-65-generic
3.19.0-65.73~14.04.1                                amd64        Linux
kernel image for version 3.19.0 on 64 bit x86 SMP
ii  linux-image-extra-3.19.0-61-generic
3.19.0-61.69~14.04.1                                amd64        Linux
kernel extra modules for version 3.19.0 on 64 bit x86 SMP
ii  linux-image-extra-3.19.0-65-generic
3.19.0-65.73~14.04.1                                amd64        Linux
kernel extra modules for version 3.19.0 on 64 bit x86 SMP
ii  linux-image-generic-lts-vivid                         3.19.0.65.47
                                       amd64        Generic Linux
kernel image

3. The above was actually a truncated example; the actual list was much longer. In summary, I had many older kernel images that I do not need anymore. In the example shown above, I decided that since I am running 3.19.0-65, I will not need the -61 image anymore. Below is the command I used to clear out -61; I ran similar commands for all the kernel images with even lower versions as well to clear up space.

me@computer:~$ sudo apt-get purge linux-image-3.19.0-61-generic

Reading package lists... Done
Building dependency tree
Reading state information... Done
The following packages will be REMOVED:
  linux-image-3.19.0-61-generic*
0 upgraded, 0 newly installed, 1 to remove and 8 not upgraded.
After this operation, 47.8 MB disk space will be freed.
Do you want to continue? [Y/n] Y
...

4. Finally, check out the contents of the /boot/ directory. If you see any orphaned files from older kernels, consider removing them to save space.

Bonus: Useful related commands

sudo apt-get autoremove
sudo apt-get clean
sudo apt-get update
sudo apt-get dist-upgrade

“autoremove” gets rid of packages that were automatically installed previously, but are no longer needed.

“cleans” empties /var/cache/apt/archives/ and /var/cache/apt/archives/partial/.

“update” updates apt-get’s list of available software packages.

“dist-upgrade” is best explained via its man page entry:


dist-upgrade in addition to performing the function of upgrade, also intelligently handles changing dependencies with new versions of packages; apt-get has a “smart” conflict resolution system, and it will attempt to upgrade the most important packages at the expense of less important ones if necessary. The dist-upgrade command may therefore remove some packages.

Backing up Android Phone to Linux

My environment: Smart phone running Android version 6.0.1, and computer running Ubuntu 16.04 LTS

I have a few key folders on my phone that I would like to back up regularly. For simplicity sake, let us say that I am just dealing with the “Camera” folder which holds all my latest photographs. The following commands makes use of gvfs-commands (Gnome virtual file system) to copy/move files, assuming the phone has been connected via USB to the computer, and the phone has been unlocked.

The bash script I currently run looks like this:

#!/bin/bash

for D in /run/user/1000/gvfs/*
do
	gvfs-copy ${D}/Phone/DCIM/Camera/*.* /picfolder/ 
	gvfs-move ${D}/Phone/DCIM/Camera/*.* /tmpfolder/
	gvfs-move /tmpfolder/*.* ${D}/Phone/Pictures/1-ToSort/ 

	echo "${D} done" 
done

As you may have noticed, I took the safe approach of copying the photos to my computer, then moving the same photos again to a temporary directory on my computer, and finally moving the temporary files back onto the phone in an archive folder. The final steps effectively represents a move from the Camera folder on the phone to the archive folder on the phone; this is because gvfs-move does not support the move of files within the same device at this time.