Parsing Apache Logs with tail, cut, sort, and uniq

A client experienced some intermittent website down time last week during the final few days of April 2021, and sent over that month’s Apache logs for me to see if there is anything out of the ordinary – excessive crawling, excessive probing, brute force password attacks, things of that nature. Below are a few commands I have used that I thought would be nice to keep handy for future uses. I am currently using Ubuntu 20.04 LTS.

While unrelated, just to form a complete picture, my client sent the logs to me in gz-compressed format. If you are not familiar on how to uncompress it, it is fairly straight forward:

gunzip 2021-APR.gz

Back on topic… I ended on parsing the file in three separate ways for me to get an overall view of things. I found that the final few days of April are represented in the roughly final 15,000 lines of the log file, so I decided to use the tail command as my main tool.

First, I did following command below to find which IP addresses hit the server the most:

tail -n 15000 filename.log | cut -f 1 -d ' ' | sort | uniq -c | sort -nr | more

Quick explanation:

  • The tail command pulls the final 15,000 lines from the log file (final few days of the month)
  • The cut command parses each line using a space delimiter and returns the first field (the IP addres)
  • The sort command sorts the results thus far
  • The uniq command groups the results thus far and provides a count
  • The second sort command reverse the sort so the highest result is on top
  • Finally, the more command creates screen-sized pagination so it’s easier to read

There is always more than one way to do something in Linux, of course. Just as an aside, the following functions very similarly:

cat filename.log | awk '{print $1}' | sort | uniq -c | sort -nr | tail -15000 | more

Then, I thought it would be nice to get an idea of how many requests were made per hour. This can be achieved with the command below.

tail -n 15000 filename.log | cut -f 4 -d ' ' | cut -f 1,2 -d ':' | sort | uniq -c | more

The main difference here is that I opted for the 4th (rather than 1st) result of the cut command, which gets me the timestamp element (rather than IP address), and then a second cut command parses it on the colon symbol and returns the first (date) and second (hour) for further grouping.

Finally, I tweaked it a little bit more so I get an idea of whether there was excessive requests within any minute-span. This can be achieved by expanding the second cut command slightly, as per below.

tail -n 15000 filename.log | cut -f 4 -d ' ' | cut -f 1,2,3 -d ':' | sort | uniq -c | more
Installing xRDP on Ubuntu

I installed xRDP on my Ubuntu 16.04 LTS so that I can easily connect to my Linux box from any Windows machine using the remote desktop tool that comes by default with every Windows installation. The actually installation is very simple:

sudo apt-get install xrdp

Through another post, you will see that I have the Xfce4 desktop environment installed:

https://www.dev-notes.com/blog/2018/03/30/installing-xfce4-desktop-environment/

Xfce4 plays very well with xRDP. To launch Xfce4 when a xRDP session is conneted, add this line to your .xsession file:

echo xfce4-session >~/.xsession

And then edit your startwm.sh file using your favorite text editor (nano is used below as example); add “startxfce4” without the quotes to the end of that file.

sudo nano /etc/xrdp/startwm.sh

At this point, you can either restart the machine, or run the two commands below to ensure xrdp is ready to accept connections.

sudo service xrdp restart
sudo /usr/sbin/xrdp-sesman

Finally, I noticed that when I am connected from a Windows machine, my tab key did not work correctly, causing me to lose the ability to autocomplete file names, among other things. It ended up the fix is very easy. Again, launch your favorite text editor to open up this Xfce configuration file:

nano ~/.config/xfce4/xconf/xfce4-keyboard-shortcuts.xml

Look for this line:

<property name="<Super>Tab" type="string" value="switch_window_key" />

And modify it to this line below:

<property name="<Super>Tab" type="empty" />

Installing Xfce4 Desktop Environment

Xfce is a light weight desktop environment for Linux that is suitable for those who prefer to not waste system resources on eye candy, for those who prefer to keep things simple, or for those who want to add a few more years of useful life to older machines. Below are the steps I followed to install Xfce4 on my machine running Ubuntu 16.04 LTS.

https://xfce.org

1. Minimally, I needed to install the main Xfce4 package.

sudo apt-get install xfce4

One of the first things I did was to adjust how the clock displayed. This guide helped me get started:

%% a literal %
%a locale's abbreviated weekday name (e.g., Sun)
%A locale's full weekday name (e.g., Sunday)
%b locale's abbreviated month name (e.g., Jan)
%B locale's full month name (e.g., January)
%c locale's date and time (e.g., Thu Mar  3 23:05:25 2005)
%C century; like %Y, except omit last two digits (e.g., 21)
%d day of month (e.g, 01)
%D date; same as %m/%d/%y
%e day of month, space padded; same as %_d
%F full date; same as %Y-%m-%d
%g last two digits of year of ISO week number (see %G)
%G year of ISO week number (see %V); normally useful only with %V
%h same as %b
%H hour (00..23)
%I hour (01..12)
%j day of year (001..366)
%k hour ( 0..23)
%l hour ( 1..12)
%m month (01..12)
%M minute (00..59)
%n a newline
%p locale's equivalent of either AM or PM; blank if not known
%P like %p, but lower case
%r locale's 12-hour clock time (e.g., 11:11:04 PM)
%R 24-hour hour and minute; same as %H:%M
%s seconds since 1970-01-01 00:00:00 UTC
%S second (00..60)
%t a tab
%T time; same as %H:%M:%S
%u day of week (1..7); 1 is Monday
%U week number of year, with Sunday as first day of week (00..53)
%V ISO week number, with Monday as first day of week (01..53)
%w day of week (0..6); 0 is Sunday
%W week number of year, with Monday as first day of week (00..53)
%x locale's date representation (e.g., 12/31/99)
%X locale's time representation (e.g., 23:13:48)
%y last two digits of year (00..99)
%Y year
%z +hhmm numeric timezone (e.g., -0400)
%Z alphabetic time zone abbreviation (e.g., EDT)

If you are curious, my setup is:

%a, %d %b %Y, %r

Which translates to, for example, “Fri, 30 Mar 2018, 10:25:25 PM”

Xfce follows the “do one thing, and do it well” philosophy, so it is literally just a desktop environment and nothing else. Read on to see the few additional packages I installed as add-ons for my Xfce installation.

2. Out of box, Xfce did not come with an application menu. I opted for Whisker menu.

sudo add-apt-repository ppa:gottcode/gcppa
sudo apt-get install xfce4-whiskermenu-plugin

You can customize various things with Whisker menu for the right look and usability that suits you.

3. I had installed this on a laptop, so it would be nice to display a battery meter. This can be done through xfce4-power-manager. As a bonus, this package also gave the ability to adjust screen brightness via a GUI tool.

sudo apt-get install xfce4-power-manager

4. There are tons of screenshot tools available for Linux, and there are actually several that are better than the Xfce one. I installed the Xfce screenshot tool nevertheless, to try it out as part of the greater Xfce offering.

sudo apt-get install xfce4-screenshooter-plugin

I set up a keyboard shortcut to the Print Screen key. The short cut runs:

xfce4-screenshooter -w -s ~/pics/screenshots/

I had wanted to try out Xfce purely out of curiocity, but I did get a nice bonus out of it — Xfce4 plays well xith xRDP, that means I could easily open a remote desktop session to my Linux machine from any Windows machine, since remote desktop comes installed by default on Windows. For details on how I installed and configured xRDP, please see:

https://www.dev-notes.com/blog/2018/03/30/installing-xrdp-on-ubuntu/

Customizing a DZ60 Keyboard using QMK

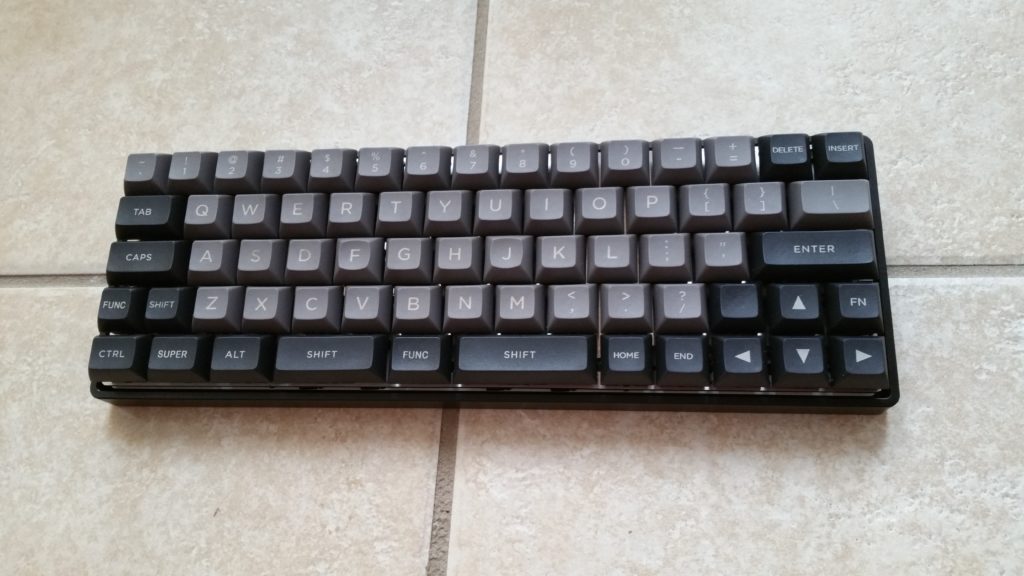
This is my 60% keyboard built on the DZ60 Rev 2.0 printed circuit board.

These are the steps I took to configure it for my use. Please note that I had configured this keyboard using Linux; Windows and Mac alternatives exist, but they are outside the scope of this article.

1. The DZ60 can be customized using Quantum Mechanical Keyboard Firmware. I downloaded a copy of it here: https://github.com/qmk/qmk_firmware/zipball/master.

2. I then unzipped the files to ~/software/qmk/

3. Run this shell script to ensure all dependencies are installed:

sudo ~/software/qmk/util/install_dependencies.sh

4. Create a folder that will hold my custom keymapping file: ~/software/qmk/keyboards/dz60/keymaps/cpc1/keymap.c

I am utilizing 4 layers. Generally speaking:

Layer 0 is the main layer containing QWERTY and other such keys that I will use most often.

Layer 1 is activated by holding the key located beneath B. This layer contains F1-F12, basic navigation (ESDF for cursor movement, page up/down), volume control, and number pad (at right hand home row region).

Layer 2 is activated by holding the key located beneath NM.. This layer contains mouse navigation keys (ESDF for mouse movement, XCV as the three mouse buttons).

Layer 3 is activated by holding the key located beneath ENTER and to the right of UP. This layer contains keyboard hardware control keys (reset, LED controls).

This is my full keymap.c file:

#include "dz60.h"
#define __      KC_TRNS
#define ___     KC_TRNS
#define _______ KC_TRNS
#define HY      KC_HYPR
#define LST     KC_LSFT
#define SP_MO1  LT(1, KC_SPC)
#define BS_MO2  LT(2, KC_BSPC)
#define PN_MO3  LT(3, KC_PSCR)
const uint16_t PROGMEM keymaps[][MATRIX_ROWS][MATRIX_COLS] = {

	// Layer 0 - Standard keyboard
	KEYMAP_2_SHIFTS(
		KC_GESC, KC_1   , KC_2   , KC_3   , KC_4   , KC_5   , KC_6   , KC_7   , KC_8   , KC_9   , KC_0   , KC_MINS, KC_EQL , KC_DEL , KC_INS, 
		KC_TAB , KC_Q   , KC_W   , KC_E   , KC_R   , KC_T   , KC_Y   , KC_U   , KC_I   , KC_O   , KC_P   , KC_LBRC, KC_RBRC, KC_BSLS, 
		KC_ESC , KC_A   , KC_S   , KC_D   , KC_F   , KC_G   , KC_H   , KC_J   , KC_K   , KC_L   , KC_SCLN, KC_QUOT, KC_ENT , 
		HY, LST, KC_Z   , KC_X   , KC_C   , KC_V   , KC_B   , KC_N   , KC_M   , KC_COMM, KC_DOT , KC_SLSH, KC_RSFT, KC_UP  , PN_MO3 ,
		KC_LCTL, KC_LGUI, KC_LALT, KC_SPC , SP_MO1 , BS_MO2 , KC_HOME, KC_END , KC_LEFT, KC_DOWN, KC_RGHT),

	// Layer 1 - Cursor Navigation, Volume, Number Pad
	KEYMAP_2_SHIFTS(
		_______, KC_F1  , KC_F2  , KC_F3  , KC_F4  , KC_F5  , KC_F6  , KC_F7  , KC_F8  , KC_F9  , KC_F10 , KC_F11 , KC_F12 , _______, _______, 
		KC_TAB , KC_HOME, KC_PGUP, KC_UP  , KC_PGDN, _______, _______, KC_7   , KC_8   , KC_9   , KC_PPLS, KC_PMNS, _______, _______, 
		_______, KC_END , KC_LEFT, KC_DOWN, KC_RGHT, _______, _______, KC_4   , KC_5   , KC_6   , KC_PAST, KC_PSLS, KC_PENT, 
		HY, LST, KC_MUTE, KC_VOLD, KC_VOLU, _______, _______, _______, KC_1   , KC_2   , KC_3   , _______, _______, _______, _______, 
		KC_LCTL, KC_LGUI, KC_LALT, _______, _______, KC_0   , KC_PDOT, _______, _______, _______, _______),

	// Layer 2 - Mouse Navigation
	KEYMAP_2_SHIFTS(
		_______, _______, KC_ACL0, KC_ACL1, KC_ACL2, _______, _______, _______, _______, _______, _______, _______, _______, _______, _______, 
		KC_TAB , _______, _______, KC_MS_U, _______, _______, _______, _______, _______, _______, _______, _______, _______, _______, 
		_______, _______, KC_MS_L, KC_MS_D, KC_MS_R, _______, _______, _______, _______, _______, _______, _______, _______, 
		HY, LST, _______, KC_BTN1, KC_BTN3, KC_BTN2, _______, _______, _______, _______, _______, _______, _______, _______, _______, 
		KC_LCTL, KC_LGUI, KC_LALT, _______, _______, _______, _______, _______, _______, _______, _______),


	// Layer 3 - Keyboard Hardware Controls
	KEYMAP_2_SHIFTS(
		RESET  , _______, _______, _______, _______, _______, _______, _______, _______, _______, _______, _______, _______, _______, _______, 
		_______, _______, _______, _______, _______, _______, _______, _______, _______, _______, _______, _______, _______, _______, 
		_______, RGB_TOG, RGB_MOD, RGB_HUI, RGB_HUD, RGB_SAI, RGB_SAD, RGB_VAI, RGB_VAD, _______, _______, _______, _______, 
		__, ___, BL_TOGG, BL_DEC , BL_INC , _______, _______, _______, _______, _______, _______, _______, _______, _______, _______, 
		_______, _______, _______, _______, _______, _______, _______, _______, _______, _______, _______),
};

5. Open a terminal window and navigate to ~/software/qmk/

6a. Run this command if you just want to create a hex file without actually flashing the keyboard:

sudo make dz60:cpc1

6b. Or, hold spacebar and B on the keyboard while plugging it into your computer; this will start the keyboard in bootloader mode. Now I can run the following command to compile the hex and then flash it onto the keyboard:

sudo make dz60:cpc1:dfu

6c. Or, if the keyboard is already plugged in and in use, run this command (same as 5b above). When the hex is built, it will prompt you to reset the keyboard so that the hex can be flashed onto the keyboard. In my case, my reset button is in Layer 3, as noted earlier.

sudo make dz60:cpc1:dfu

Additional info:

Full Documentation: https://docs.qmk.fm
GitHub of QMK Project: https://github.com/qmk/qmk_firmware/

How to Install Rails on CentOS 7

Install prerequisite dependencies

$ sudo yum install -y git-core zlib zlib-devel gcc-c++ patch readline readline-devel libyaml-devel libffi-devel openssl-devel make bzip2 autoconf automake libtool bison curl sqlite-devel

Install rbenv

$ git clone https://github.com/rbenv/rbenv.git ~/.rbenv
$ cd ~/.rbenv && src/configure && make -C src
$ echo 'export PATH=$HOME/.rbenv/bin:$PATH' >> ~/.bash_profile

Run rbenv init, and follow the instructions.

$ rbenv init
# Load rbenv automatically by appending
# the following to ~/.bash_profile:

eval "$(rbenv init -)"

Restart your shell.

Install ruby-build plugin to get access to rbenv install.

$ git clone https://github.com/rbenv/ruby-build.git ~/.rbenv/plugins/ruby-build

Finally, install ruby, and confirm version.

$ rbenv install 2.2.2
...
$ ruby -v
ruby 2.2.2p95 (2015-04-13 revision 50295) [x86_64-linux]

Confirm sqlite3 is installed

$ sqlite3 --version
3.7.17 2013-05-20 00:56:22 118a3b35693b134d56ebd780123b7fd6f1497668

Install rails using gem.
NOTE: I originally had some trouble running this command because the version of ruby kept going back to 2.0.0, which is the default version for my installation of CentOS. I had to manually add a .ruby-version file into my working directory with the contents 2.2.2 in order for the gem command to proceed with the rails installation. I don’t know if this is the correct way of doing this.

$ gem install rails
...
$ rails --version
Rails 5.0.0.1

Generate SSL key and certificate using openssl

$ mkdir ~/gencerts
$ cd ~/gencerts
$ openssl genrsa -des3 -passout pass:x -out server.pass.key 2048
$ openssl rsa -passin pass:x -in server.pass.key -out server.key
$ openssl req -new -key server.key -out server.csr

You are about to be asked to enter information that will be incorporated
into your certificate request.
What you are about to enter is what is called a Distinguished Name or a DN.
There are quite a few fields but you can leave some blank
For some fields there will be a default value,
If you enter '.', the field will be left blank.
-----
Country Name (2 letter code) [XX]:US
State or Province Name (full name) []:Massachusetts
Locality Name (eg, city) [Default City]:Boston
Organization Name (eg, company) [Default Company Ltd]:MyOrg
Organizational Unit Name (eg, section) []:MyUnit
Common Name (eg, your name or your server's hostname) []: my.server.com
Email Address []:foobar@my.server.com

Please enter the following 'extra' attributes
to be sent with your certificate request
A challenge password []:
An optional company name []:

$ openssl x509 -req -sha256 -days 365 -in server.csr -signkey server.key -out server.crt
$ mkdir ../ssl
$ cp server.key ../ssl/dev.key
$ cp server.crt ../ssl/dev.crt

Install local docker and docker-compose on CentOS 7

Configure the docker repository with yum

$ sudo tee /etc/yum.repos.d/docker.repo <<-'EOF' > [dockerrepo]
> name=Docker Repository
> baseurl=https://yum.dockerproject.org/repo/main/centos/7/
> enabled=1
> gpgcheck=1
> gpgkey=https://yum.dockerproject.org/gpg
> EOF

Install and start local docker

$ sudo yum install docker-engine
$ sudo systemctl enable docker.service
$ sudo systemctl start docker

Run a sanity check to see if docker is working properly

$ sudo docker run --rm hello-world
Unable to find image 'hello-world:latest' locally
latest: Pulling from library/hello-world
c04b14da8d14: Pull complete 
Digest: sha256:0256e8a36e2070f7bf2d0b0763dbabdd67798512411de4cdcf9431a1feb60fd9
Status: Downloaded newer image for hello-world:latest

Hello from Docker!
This message shows that your installation appears to be working correctly.

To generate this message, Docker took the following steps:
 1. The Docker client contacted the Docker daemon.
 2. The Docker daemon pulled the "hello-world" image from the Docker Hub.
 3. The Docker daemon created a new container from that image which runs the
    executable that produces the output you are currently reading.
 4. The Docker daemon streamed that output to the Docker client, which sent it
    to your terminal.

To try something more ambitious, you can run an Ubuntu container with:
 $ docker run -it ubuntu bash

Share images, automate workflows, and more with a free Docker Hub account:
 https://hub.docker.com

For more examples and ideas, visit:
 https://docs.docker.com/engine/userguide/

To allow the user to run docker without sudo, create a “docker” group and add yourusername to it.

$ sudo groupadd docker
$ sudo usermod -aG docker yourusername

Log out and log back in for the group changes to go into effect. Try it out:

$ docker run --rm hello-world

Enable docker to be run after reboot

$ sudo systemctl enable docker

Install docker-compose

$ sudo -i
# curl -L https://github.com/docker/compose/releases/download/1.9.0/docker-compose-`uname -s`-`uname -m` > /usr/local/bin/docker-compose
  % Total    % Received % Xferd  Average Speed   Time    Time     Time  Current
                                 Dload  Upload   Total   Spent    Left  Speed
100   600    0   600    0     0   2848      0 --:--:-- --:--:-- --:--:--  2870
100 7857k  100 7857k    0     0  15.5M      0 --:--:-- --:--:-- --:--:-- 15.5M
# chmod +x /usr/local/bin/docker-compose
# exit
$ logout

Check that docker is running

$ docker ps -a
CONTAINER ID        IMAGE               COMMAND                  CREATED             STATUS              PORTS                                      NAMES

Ubuntu Boot Partition Full

The other day when I attempted to run some regular updates for my Linux box (running Ubuntu 14.04 LTS), I encountered the message that the update could no proceed because the boot partition was full. Here are the steps I took to clear unneeded files from the boot partition.

1. First, I found out that I am running kernel 3.19.0-65 with this command below.

me@computer:~$  uname -r

3.19.0-65-generic

2. Next, list what kernel images are present in my root partition.

me@computer:~$ dpkg --list | grep linux-image

ii  linux-image-3.19.0-61-generic
3.19.0-61.69~14.04.1                                amd64        Linux
kernel image for version 3.19.0 on 64 bit x86 SMP
ii  linux-image-3.19.0-65-generic
3.19.0-65.73~14.04.1                                amd64        Linux
kernel image for version 3.19.0 on 64 bit x86 SMP
ii  linux-image-extra-3.19.0-61-generic
3.19.0-61.69~14.04.1                                amd64        Linux
kernel extra modules for version 3.19.0 on 64 bit x86 SMP
ii  linux-image-extra-3.19.0-65-generic
3.19.0-65.73~14.04.1                                amd64        Linux
kernel extra modules for version 3.19.0 on 64 bit x86 SMP
ii  linux-image-generic-lts-vivid                         3.19.0.65.47
                                       amd64        Generic Linux
kernel image

3. The above was actually a truncated example; the actual list was much longer. In summary, I had many older kernel images that I do not need anymore. In the example shown above, I decided that since I am running 3.19.0-65, I will not need the -61 image anymore. Below is the command I used to clear out -61; I ran similar commands for all the kernel images with even lower versions as well to clear up space.

me@computer:~$ sudo apt-get purge linux-image-3.19.0-61-generic

Reading package lists... Done
Building dependency tree
Reading state information... Done
The following packages will be REMOVED:
  linux-image-3.19.0-61-generic*
0 upgraded, 0 newly installed, 1 to remove and 8 not upgraded.
After this operation, 47.8 MB disk space will be freed.
Do you want to continue? [Y/n] Y
...

4. Finally, check out the contents of the /boot/ directory. If you see any orphaned files from older kernels, consider removing them to save space.

Bonus: Useful related commands

sudo apt-get autoremove
sudo apt-get clean
sudo apt-get update
sudo apt-get dist-upgrade

“autoremove” gets rid of packages that were automatically installed previously, but are no longer needed.

“cleans” empties /var/cache/apt/archives/ and /var/cache/apt/archives/partial/.

“update” updates apt-get’s list of available software packages.

“dist-upgrade” is best explained via its man page entry:


dist-upgrade in addition to performing the function of upgrade, also intelligently handles changing dependencies with new versions of packages; apt-get has a “smart” conflict resolution system, and it will attempt to upgrade the most important packages at the expense of less important ones if necessary. The dist-upgrade command may therefore remove some packages.

Backing up Android Phone to Linux

My environment: Smart phone running Android version 6.0.1, and computer running Ubuntu 16.04 LTS

I have a few key folders on my phone that I would like to back up regularly. For simplicity sake, let us say that I am just dealing with the “Camera” folder which holds all my latest photographs. The following commands makes use of gvfs-commands (Gnome virtual file system) to copy/move files, assuming the phone has been connected via USB to the computer, and the phone has been unlocked.

The bash script I currently run looks like this:

#!/bin/bash

for D in /run/user/1000/gvfs/*
do
	gvfs-copy ${D}/Phone/DCIM/Camera/*.* /picfolder/ 
	gvfs-move ${D}/Phone/DCIM/Camera/*.* /tmpfolder/
	gvfs-move /tmpfolder/*.* ${D}/Phone/Pictures/1-ToSort/ 

	echo "${D} done" 
done

As you may have noticed, I took the safe approach of copying the photos to my computer, then moving the same photos again to a temporary directory on my computer, and finally moving the temporary files back onto the phone in an archive folder. The final steps effectively represents a move from the Camera folder on the phone to the archive folder on the phone; this is because gvfs-move does not support the move of files within the same device at this time.

Searching for file name or file content in Linux

To search for a file by its name, follow the example below.

[username@machine ~]$ find / -name 'myLostFile*.txt'

/home/username/foldername/myLostFile_Feb2009.txt
/home/username/foldername/myLostFile_Mar2009.txt

Note that “find” is the command we wish to run. The “/” denotes where to start looking. We began looking from the root “/” here; if you know a more specific path where the file is, you can narrow it down by providing a path, such as “/home/username/” or “.”. The “-name” specifies we are searching by file name.

By adding “-ls” at the end, we can return more details on the matched files. Example below:

[username@machine ~]$ find . -name 'myLostFile*.txt' -ls

13795398 2310924 -rw-r--r--   1 username  username 2364071936 Feb 19 14:08 ./myLostFile_Feb2009.txt
13795396 59012 -rw-r--r--   1 username  username 60362752 Mar 10 08:29 ./myLostFile_Mar2009.txt

At times, we may need to search through the content of the files as well. To do so, follow the example below:

[username@machine ~]$ find . -type f -exec grep -H "dev-notes.com" {} ;

./myLostFile_Mar2009.txt:To do - write an article on Linux find command for dev-notes.com

We will get the file path and name in the first portion (before the colon symbol) of each output line. The particular line of that matched our search criteria will be displayed in the second portion. If multiple lines within the same file matches and/or if matches are found across multiple files, more than one output line will be displayed.